BDSM Furniture Plans for Practical, Custom Lifestyle Creations

BDSM Furniture Plans for Practical, Custom Lifestyle Creations

Hey there! So, you're looking to build some custom BDSM furniture? Awesome! This isn't your average IKEA project, that's for sure. We're talking about creating pieces designed for comfort, safety, and enhancing your unique play style. Whether you're a seasoned pro or just starting to explore, building your own furniture can be incredibly rewarding. It allows for total customization, ensuring everything fits perfectly with your preferences and body type. Plus, there's a real sense of accomplishment in creating something so personal.

Understanding Your Needs: Before You Even Grab a Saw

Before diving into plans, let's talk about what you actually need. This isn't a one-size-fits-all situation. Think about:

Your Play Style and Preferences:

What kind of BDSM are you into? Different styles require different furniture. Are you focused on restraint? Suspension? Impact play? Knowing this helps determine the essential features your furniture needs. For example, a suspension rig needs incredibly strong anchors and sturdy construction, while a comfortable bondage chair might prioritize padding and adjustability.

Space and Budget:

How much space do you have dedicated to your play area? A sprawling dungeon is very different from a smaller, more intimate setup. This dictates the size and complexity of your projects. Your budget also plays a huge role. Certain materials (like stainless steel) are more expensive than others (like wood). Planning ahead helps you choose the right materials and designs within your means.

Safety First!:

Safety should always be your top priority. This means using high-quality materials and hardware capable of handling stress and weight. Consider things like:

  • Strong, secure anchoring points for suspension systems.
  • Padding to prevent bruising or injury during restraint.
  • Easy-to-use release mechanisms for all restraints.
  • Durable materials that can withstand the rigors of play.

Choosing Your Materials: Strength and Aesthetics

The materials you choose significantly impact the durability, safety, and aesthetic of your furniture. Here are some popular options:

Wood:

Wood is a classic choice for BDSM furniture, offering a natural look and feel. Hardwoods like oak or maple are strong and durable, but softer woods like pine are easier to work with for beginners. Remember to properly seal and finish the wood to protect it from moisture and wear.

Metal:

Metal, particularly stainless steel, is extremely strong and durable. It's ideal for suspension systems and other applications requiring significant load-bearing capacity. However, metal can be more challenging to work with, requiring specialized tools and skills.

Leather and Upholstery:

Leather and other upholstery materials are essential for adding comfort and cushioning. Look for durable, easy-to-clean materials that can withstand regular use. Consider the breathability of the material, especially if you'll be using the furniture for extended periods.

Sample Project Ideas: From Simple to Advanced

Let's brainstorm some project ideas to get your creative juices flowing:

A Simple Bondage Chair:

A basic bondage chair is a great starting project for beginners. You can build it from wood, incorporating padded restraints and comfortable cushioning. This project allows you to practice basic woodworking techniques while creating a functional and safe piece.

An Advanced Suspension Rig:

This is a much more complex project, requiring significant woodworking or metalworking skills. It involves building a sturdy frame with secure anchor points for ropes and slings. Remember that safety is paramount here. Make sure you understand the physics of suspension and have the appropriate safety measures in place.

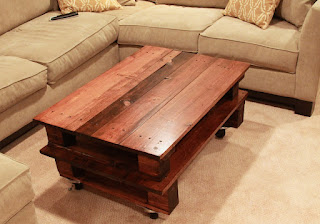
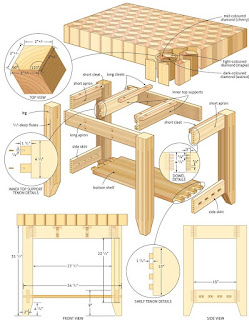
A Customizable Restraint Table:

A restraint table can be customized to incorporate various restraints and features, making it incredibly versatile. It allows for a wide range of play styles, offering both comfort and secure restraint.

Finding Plans and Resources

Finding detailed plans for BDSM furniture can be tricky. While many online resources offer DIY furniture plans, specialized BDSM furniture plans are less common. Consider these options:

  • Search for specialized forums and communities: Many online communities dedicated to BDSM have members who share their DIY projects and plans.
  • Commission custom designs: If you're not comfortable building it yourself, consider commissioning a custom-made piece from a skilled craftsperson.
  • Adapt existing furniture plans: You can adapt existing furniture plans (like chair or table plans) to incorporate BDSM-specific features.

Commonly Asked Questions

Here are some questions I frequently get about building BDSM furniture:

Q: Is it safe to build my own BDSM furniture?

A: Yes, it can be, but only if you prioritize safety throughout the process. Use high-quality materials, follow proper construction techniques, and thoroughly test your creation before use.

Q: What tools do I need?

A: The tools you need will depend on your chosen project and materials. Basic woodworking tools (saw, drill, sander) are a good start. For metalwork, you'll need more specialized equipment.

Q: Where can I find the right hardware?

A: Hardware stores, online retailers, and specialized BDSM suppliers offer a range of hardware suitable for BDSM furniture. Look for high-quality, heavy-duty items.

Q: How do I ensure my furniture is comfortable?

A: Consider using comfortable padding and upholstery. Ergonomics also play a crucial role. Design the furniture to support the body's natural curves and avoid pressure points.

Q: What if I make a mistake?

A: Don't worry! Everyone makes mistakes. Take your time, plan carefully, and don't be afraid to ask for help. You can always adjust your plans or start over if necessary.

Remember, building your own BDSM furniture is a journey of creativity and self-expression. Have fun, stay safe, and enjoy the process!

Share:

Simple Yet Stylish Woodworking Plans for Coffee Tables

Simple Yet Stylish Woodworking Plans for Coffee Tables

Transform your living room with a handcrafted coffee table! This article provides simple yet stylish woodworking plans that even beginners can tackle. We'll explore designs that prioritize clean lines and functionality, allowing you to showcase your woodworking skills while creating a beautiful and practical piece of furniture. Forget generic store-bought tables; let's build something truly unique and personal.

The Classic Minimalist Coffee Table

This design champions simplicity. Its clean lines and straightforward construction make it an ideal project for aspiring woodworkers. The minimalist aesthetic allows the beauty of the wood grain to shine. We'll use a single, large slab of wood for the tabletop, supported by a sturdy base crafted from equally simple, yet elegant, legs. This plan emphasizes the quality of materials over complex joinery.

Materials You'll Need:

  • One large slab of hardwood (e.g., walnut, oak, maple) – consider the size and thickness you desire for your table.
  • Four sturdy legs made from the same hardwood or a contrasting wood for a striking visual effect.
  • Wood glue
  • Wood screws
  • Sandpaper (various grits)
  • Wood finish (e.g., oil, varnish, polyurethane)

Construction Steps:

  1. Prepare the tabletop: Sand the slab smooth, ensuring all edges are even. Apply your chosen wood finish.
  2. Attach the legs: Use wood glue and screws to securely attach the legs to the underside of the tabletop. Consider using a leg leveler for added stability.
  3. Finishing Touches: Once the glue is dry, sand any remaining imperfections and apply a final coat of finish.

The Live-Edge Coffee Table with X-Base

For a more rustic and natural look, embrace the live edge of a slab of wood. This feature adds character and a unique touch. Pairing this natural element with a modern, geometric X-base creates a stunning contrast, blending rustic charm with contemporary design. This design elevates the coffee table beyond mere functionality into a statement piece.

Materials You'll Need:

  • One slab of wood with a live edge (consider species such as reclaimed wood or maple).
  • Four pieces of hardwood for the X-base.
  • Wood screws and/or strong wood glue
  • Wood filler (to fill any gaps or imperfections in the live edge)
  • Sandpaper
  • Wood finish

Construction Steps:

  1. Prepare the live edge: Fill any gaps or cracks in the live edge using wood filler. Sand the top smooth.
  2. Assemble the X-base: Carefully join the four pieces of wood to create the X-shape. Use wood glue and screws for a robust connection.
  3. Attach the tabletop: Securely attach the X-base to the underside of the live-edge slab. Ensure even distribution of weight.
  4. Finishing Touches: Sand and apply your chosen wood finish.

Choosing Your Wood and Finish

The choice of wood significantly impacts the final aesthetic. Hardwoods like oak, walnut, and cherry offer durability and a rich look. Softwoods like pine can provide a more rustic feel. Consider the color and grain of the wood to complement your existing décor. Experiment with different wood finishes to achieve your desired level of shine and protection. A simple oil finish accentuates the natural wood grain, while a polyurethane offers greater protection against spills and wear.

With careful planning and execution, creating a beautiful and functional coffee table is entirely within your reach. These simple plans offer a starting point, allowing you to personalize the design and create a truly unique piece for your home. Enjoy the process!

Share:

Build a Shaker-Style Shelf with These Woodworking Plans

Crafting a Classic: Building a Shaker-Style Shelf

The Shaker aesthetic, with its clean lines, simple elegance, and focus on functionality, continues to inspire modern woodworking projects. This article guides you through building a beautiful and sturdy Shaker-style shelf, perfect for any room in your home. We'll walk you through each step, from selecting materials to adding the finishing touches, ensuring you create a piece you'll cherish for years to come.

Gathering Your Materials and Tools

Before you begin, gather the necessary materials. For this project, you'll need hardwood lumber such as maple, cherry, or oak, known for their durability and pleasing grain. The exact dimensions will depend on your desired shelf size, but plan for at least three pieces: two side supports and one shelf. You'll also need wood glue, wood screws of appropriate length, wood filler, sandpaper (various grits), and finish of your choice – a clear coat will showcase the wood's natural beauty, while a paint finish offers more color options. For tools, gather a measuring tape, pencil, saw (circular saw or hand saw), drill with appropriate drill bits, clamps, square, and sanding block.

Cutting and Assembling the Shelf Components

Cutting the Wood to Size

Begin by precisely measuring and cutting your hardwood lumber according to your design. Accuracy is crucial for a professional-looking finish. Use a sharp saw to ensure clean, straight cuts. Remember to account for the thickness of your shelf when determining the height of the side supports. Consider using a miter saw for perfectly squared ends. Double-check your measurements before each cut to prevent mistakes!

Joining the Shelf and Supports

Once cut, carefully apply wood glue to the mating surfaces of the shelf and the side supports. Then, secure the pieces together using wood screws, ensuring the screws are countersunk just below the surface of the wood. Use clamps to hold the pieces firmly in place while the glue dries, ensuring a strong and even bond. This allows for ample drying time and prevents warping. Allow the glue to cure completely according to the manufacturer's instructions.

Finishing Touches: Refinement and Detailing

Filling and Sanding

After the glue has fully dried, inspect the shelf for any gaps or imperfections. Fill any holes left by the screws with wood filler, allowing it to dry completely before sanding. Sand the entire surface of the shelf using progressively finer grits of sandpaper, starting with a coarser grit to remove any blemishes and finishing with a fine grit for a smooth, polished finish. This step ensures a flawless surface for your chosen finish.

Applying the Finish

Finally, apply your chosen finish according to the manufacturer's instructions. Multiple thin coats are better than one thick coat to avoid drips and runs. Allow each coat to dry completely before applying the next. Sand lightly between coats with very fine grit sandpaper for the smoothest possible result. Once the finish is completely dry, you'll have a stunning Shaker-style shelf ready to display your treasured possessions.

Adding Optional Features

To personalize your shelf, consider adding optional features. You could add decorative molding to the edges, incorporate a subtle dado joint for a more advanced joinery technique, or experiment with different wood stains to achieve a unique color. The possibilities are endless, allowing you to tailor your project to your personal style.

Building your own Shaker-style shelf is a rewarding woodworking project that allows you to showcase your craftsmanship and create a beautiful, functional piece for your home. Follow these steps, take your time, and enjoy the process!

Share:

DIY Baby Furniture Plans for a Personalized Nursery Makeover

DIY Baby Furniture Plans for a Personalized Nursery Makeover

So, you're expecting, congratulations! And you're thinking about tackling a nursery makeover? Awesome! Building your own baby furniture is a fantastic way to personalize the space and save a bunch of money. It's also incredibly rewarding – trust me, there's nothing like seeing your little one snuggled in a crib you built with your own two hands. This isn't about being a master carpenter; it's about having fun, being creative, and creating a truly special space for your baby. Let's dive into some DIY baby furniture plans that are manageable, even for beginners!

Choosing Your Project: Starting Small (or Big!)

Before you grab your tools, let's talk strategy. Picking the right project is key. If this is your first foray into DIY furniture, starting with something smaller might be a good idea. Don't feel pressured to build everything from scratch! You can easily mix and match DIY projects with store-bought pieces to create a unique and cohesive look.

Beginner-Friendly Projects:

  • Toy Storage Bins: These are super simple. You can use inexpensive plywood, paint them fun colors, and add some handles. Tons of tutorials are available online!
  • Changing Pad Cover: Skip the expensive store-bought covers and sew your own! It's a fantastic way to personalize the changing station and you can match the fabric to your nursery's theme.
  • Floating Shelves: Perfect for displaying adorable baby clothes or books. These are relatively straightforward and can add a lot of character to the room.

Intermediate Projects:

  • Simple Crib: Okay, this is a bigger commitment, but many plans for basic cribs exist online. Ensure you prioritize safety and adhere strictly to all crib safety standards.
  • Dresser: Again, a bigger project but incredibly satisfying. You can customize the size, number of drawers, and even add some unique features like built-in changing trays.
  • Bookcase: A great way to store all those storybooks. You can choose a style that complements your chosen nursery theme.

Advanced Projects (for the Experienced DIYer):

  • Custom Wardrobe: This is a major undertaking, requiring precise measurements and advanced woodworking skills.
  • Rocking Chair: A classic nursery piece. However, rocking chairs require careful craftsmanship for both comfort and safety.

Essential Tools and Materials

The specific tools and materials you'll need will depend on your chosen project. However, here are some basics that will come in handy for most DIY baby furniture projects:

  • Measuring Tape and Pencil: Accurate measurements are crucial!
  • Safety Glasses and Dust Mask: Protect your eyes and lungs from sawdust and debris.
  • Saw (Circular Saw or Hand Saw): For cutting wood.
  • Drill and Drill Bits: For creating pilot holes and attaching hardware.
  • Screwdriver (Phillips and Flathead): For securing screws.
  • Wood Glue: For stronger joints.
  • Sandpaper (various grits): For smoothing surfaces.
  • Wood Stain or Paint: To finish your furniture.
  • Wood: Choose a safe, non-toxic wood like pine or poplar.

Finding DIY Plans and Inspiration

The internet is your oyster! There are countless websites and blogs dedicated to DIY furniture projects. Pinterest is a treasure trove of inspiration, and YouTube is packed with helpful video tutorials. When searching, be specific. Instead of just "DIY crib," try "DIY minimalist crib plans" or "DIY farmhouse-style changing table".

Pro-tip: Don't be afraid to adapt plans to your own needs and preferences. If you find a plan you like but want to change the dimensions or add some unique features, go for it!

Safety First!

Safety should always be your top priority when building baby furniture. Here are some crucial things to keep in mind:

  • Use non-toxic materials: Ensure all paints, stains, and finishes are baby-safe.
  • Follow safety standards: For cribs, specifically, there are strict safety regulations to adhere to. Research these carefully before you begin.
  • Check for sharp edges and splinters: Sand down all surfaces thoroughly to prevent injuries.
  • Secure all hardware: Make sure screws and other fasteners are tightly secured.
  • Test for stability: Ensure the furniture is sturdy and won't tip over.

Finishing Touches and Personalization

Once your furniture is built and finished, it's time to personalize it! This is where you can truly let your creativity shine. Consider:

  • Painting: Choose colors that complement your nursery's theme.
  • Stencils: Add fun patterns and designs.
  • Fabric: Use fabric scraps to create unique details or covers.
  • Hardware: Choose knobs and handles that match your style.

Remember, the most important thing is to have fun and create a nursery that you and your baby will love!

Commonly Asked Questions

Q: What kind of wood is best for baby furniture?

A: Pine and poplar are popular choices because they are relatively inexpensive, easy to work with, and readily available. Make sure to use wood that is untreated and free of harmful chemicals.

Q: Are DIY cribs safe?

A: Yes, DIY cribs can be safe, but only if you follow all safety standards and regulations meticulously. Thorough research and attention to detail are paramount. Consider using pre-made crib parts to help ensure safety.

Q: How long does it take to build DIY baby furniture?

A: That really depends on the project's complexity and your experience level. A simple project like a toy bin might take a few hours, while a crib could take several days or even a week.

Q: What if I make a mistake?

A: Don't worry! Everyone makes mistakes. That's part of the learning process. Sometimes, you can fix the mistake; other times, you might need to start over. The important thing is to learn from your mistakes and keep practicing.

Q: Where can I find detailed plans?

A: Websites like Ana White, Pinterest, and various woodworking blogs offer a wealth of free and paid plans. YouTube is also a great resource for video tutorials.

Share:

Unique Woodworking Plans for Kids’ Wooden Toys

Ignite Their Imagination: Unique Woodworking Plans for Kids' Wooden Toys

Crafting wooden toys for children is a rewarding experience that blends creativity with practicality. It allows you to create heirloom-quality gifts, fostering a connection between maker and child that transcends mass-produced items. This article provides unique woodworking plans, designed to inspire and guide you through the process of building durable and engaging toys. Forget generic store-bought toys; let's build something truly special!

A Whimsical Wooden Train

This isn't your average train set. We're building a whimsical, customizable train that encourages imaginative play. Start with the engine – a simple rectangular box with carefully cut-out wheel wells. Attach sturdy wheels using dowels or screws. For a truly unique touch, consider adding a small smokestack made from a dowel and a meticulously carved whistle from a separate piece of wood. The carriages follow a similar design, allowing for diverse shapes and sizes. Paint them in bright, cheerful colors, add whimsical faces, and watch your child's imagination soar!

Materials You'll Need:

  • Various sizes of wood blocks (softwood like pine is ideal)
  • Small dowels for wheels and axles
  • Wood glue
  • Sandpaper (various grits)
  • Paint and brushes
  • Optional: Decorative elements like buttons, beads, felt

Construction Steps:

  • Cut the wood blocks to your desired sizes for the engine and carriages.
  • Drill holes for the wheels and axles, ensuring a snug fit.
  • Assemble the train using wood glue, allowing ample drying time.
  • Sand all surfaces smooth to prevent splinters.
  • Paint and decorate the train to your child's liking.

A Stacking Rainbow

Stacking toys are classics for a reason! This rainbow, however, offers a unique twist. Instead of simple cylinders, we'll craft slightly irregular, organically shaped blocks in a vibrant spectrum of colors. The varying shapes make stacking more challenging and engaging, encouraging problem-solving skills. Use a combination of hand tools and perhaps a jigsaw to create these colorful, uneven shapes – embrace the imperfections; they add character!

Materials You'll Need:

  • Various sizes and shapes of wood scraps
  • Wood glue
  • Sandpaper
  • Non-toxic wood stains or paints
  • Clear sealant (optional)

Construction Steps:

  • Sketch out your rainbow arc on paper first, deciding on the size and number of blocks.
  • Cut the wood pieces to your desired shapes and sizes, focusing on creating a natural, slightly uneven feel.
  • Sand all edges thoroughly.
  • Apply wood stain or paint in rainbow order, allowing each layer to dry completely.
  • Seal the blocks with a clear sealant (optional) to enhance durability.

A Pull-Along Wooden Animal

This project lets you create a charming, personalized pull-along toy. Choose your child's favorite animal – a playful puppy, a graceful giraffe, or a friendly bear. The body is a simple block of wood, with legs attached using dowels or small wooden pegs. A sturdy rope or cord serves as the pull string, attached securely to the animal's body. Carving simple facial features adds a delightful personal touch.

Materials You'll Need:

  • A single block of wood for the body
  • Smaller wood pieces for legs
  • Wood glue
  • Sandpaper
  • Paint and brushes
  • Rope or cord

Construction Steps:

  • Cut the body and leg pieces to size.
  • Drill holes in the body for the legs.
  • Attach legs using wood glue and dowels or pegs, ensuring a stable connection.
  • Sand all surfaces smooth.
  • Paint the animal, add facial features, and attach the pull string.

Remember, safety is paramount! Always supervise children while they play with any wooden toy, and ensure all edges are smooth and free of splinters. Enjoy the creative process and the joy of gifting something handmade and unique!

Share:

Explore Free Woodworking Project Ideas for Your Home

Unlock Your Inner Craftsman: Free Woodworking Projects for Your Home

The satisfying scent of freshly cut wood, the rhythmic whir of tools, and the pride of creating something beautiful with your own hands – woodworking offers a unique blend of creativity and practicality. And the best part? You don't need a hefty budget to get started. Numerous free woodworking plans are readily available online, allowing you to transform simple lumber into stunning additions to your home. This article explores several free projects, perfect for beginners and seasoned woodworkers alike, helping you unleash your inner craftsman and add character to your living space.

Simple Shelves: A Beginner's Dream

Begin your woodworking journey with a project that's both functional and forgiving: simple shelves. These require minimal tools and skills, making them an ideal starting point. You can find countless free plans online detailing various styles, from rustic floating shelves to sleek, modern designs. Choose a plan that suits your skill level and desired aesthetic. Start by carefully measuring your wall space and selecting appropriately sized wood. Many plans use readily available lumber from your local hardware store. Accurate cuts are crucial, so take your time and use a measuring tape meticulously. Once the pieces are cut, you'll assemble them using wood glue and screws, ensuring a sturdy and secure attachment to the wall. The finished product provides valuable storage and instantly enhances your home's décor.

Essential Tools for Simple Shelves:

  • Measuring tape
  • Saw (circular saw or hand saw)
  • Drill
  • Screws
  • Wood glue
  • Level
  • Sandpaper

Rustic Wooden Coasters: A Quick and Easy Project

If you're looking for a faster project to test the waters, consider crafting a set of rustic wooden coasters. These require minimal materials – small squares of wood, sandpaper, and a protective finish (such as polyurethane or varnish). You can find numerous free plans online showcasing different shapes and sizes. Personalize your coasters by adding unique engravings, burning designs, or using different wood stains for a varied aesthetic. This project perfectly showcases the beauty of natural wood grain and provides a functional addition to your home, protecting surfaces from spills and adding a touch of rustic charm. Remember to sand the edges thoroughly for a smooth and safe finish.

A Birdhouse for the Backyard: A More Challenging Undertaking

For woodworkers ready to tackle a slightly more challenging project, a birdhouse offers a rewarding experience. Many free plans are available online, ranging in complexity from simple designs to intricate, multi-compartment birdhouses. Carefully select a plan that aligns with your skillset and available time. Accurate measurements and precise cuts are essential for a functional and structurally sound birdhouse. Beyond the basic carpentry, consider adding decorative elements to make your birdhouse truly unique. A well-crafted birdhouse not only attracts feathered friends to your backyard but also serves as a beautiful ornament, showcasing your woodworking skills.

Beyond the Basics: Exploring More Advanced Projects

Once you've mastered the basics, the world of free woodworking plans opens up considerably. Consider more complex projects such as a simple workbench, a small storage chest, or even a charming rocking chair. Always remember to prioritize safety when working with power tools. Take your time, carefully follow the instructions, and don't hesitate to consult online resources or videos for guidance. With dedication and practice, you'll progress to more intricate designs, creating unique and valuable additions to your home while honing your woodworking skills.

Share:

Essential Woodwork Plans: Build Like a Pro with Easy Guides

Essential Woodwork Plans: Build Like a Pro with Easy Guides

Hey there, fellow woodworkers! So you're itching to get your hands dirty and build some amazing things out of wood? That's awesome! Whether you're a seasoned pro looking for new challenges or a complete beginner just starting out, this guide is packed with essential woodworking plans and tips to help you build like a pro. We're going to keep it simple, fun, and most importantly, practical.

Getting Started: The Essentials

Before you dive headfirst into building your masterpiece, let's cover some basics. Having the right tools and understanding some fundamental techniques will make your woodworking journey much smoother (and safer!).

Tools of the Trade

You don't need a massive workshop filled with every tool imaginable to get started. Start with the essentials, and gradually expand your collection as your skills and projects grow. Here's a good starting point:

  • Measuring Tape: Accuracy is key! Get a reliable tape measure.
  • Pencil: For marking your cuts and designs.
  • Hand Saw: A good starting saw for most projects.
  • Chisels: For shaping and cleaning up edges.
  • Hammer: For driving nails and assembling projects.
  • Screwdrivers: Phillips and flathead, in various sizes.
  • Safety Glasses: Protect your eyes – this is non-negotiable!
  • Clamps: To hold pieces together while gluing or screwing.
  • Sandpaper: Various grits for smoothing surfaces (start with coarser grits and work your way to finer ones).

As you progress, you might consider adding power tools like a circular saw, jigsaw, drill, and sander. But for now, these basic hand tools will get you a long way.

Safety First!

Woodworking can be dangerous if you're not careful. Always prioritize safety:

  • Wear safety glasses: This should be your first habit.
  • Use proper hearing protection: Power tools can be loud.
  • Keep your work area clean and organized: A cluttered workspace is an accident waiting to happen.
  • Use clamps to secure your work: This prevents kickback and improves accuracy.
  • Never rush: Take your time and focus on what you're doing.

Simple Projects for Beginners

Let's start with some straightforward projects that are perfect for beginners. These projects will help you build confidence and learn essential techniques.

A Simple Shelf

Building a shelf is a great introduction to woodworking. You'll learn about measuring, cutting, assembling, and finishing. You can find many free plans online for simple shelves, focusing on using basic cuts and simple joinery like screwing or using shelf brackets.

A Birdhouse

Birdhouses are fun, relatively quick projects. They're a fantastic way to practice your cutting and assembly skills. Again, you can find numerous free plans available online, offering varying levels of complexity.

A Wooden Box

A wooden box is another excellent project for beginners. It helps you practice accurate measuring and cutting, as well as different joinery techniques like rabbet joints (though you can keep it simple with butt joints and glue/screws for a first attempt!).

Intermediate Woodworking Projects

Once you've mastered the basics, it's time to tackle more challenging projects that will push your skills and creativity.

A Coffee Table

Building a coffee table is a significant step up from simpler projects. It requires more precise cuts, potentially more advanced joinery (like mortise and tenon or dowel joints), and a higher level of finishing. This is where having a few power tools can be beneficial.

A Small Desk

Similar to the coffee table, a small desk involves more complex construction and potentially requires more advanced woodworking techniques like using drawers slides.

A Simple Chair

Building a chair can be quite challenging, but incredibly rewarding. This project teaches you about curves, shaping, joinery specific to seating, and how to create a comfortable and sturdy structure. Start with a simpler design, possibly a child's chair, to gain confidence.

Advanced Woodworking Projects

For experienced woodworkers, these projects will truly test your skills and creativity. They often involve intricate designs, specialized tools, and advanced joinery techniques.

A Full-Size Desk

Creating a full-size desk takes your woodworking skills to the next level, necessitating more precise measurements and planning, as well as more advanced joinery.

A Custom Bookshelf

A custom bookshelf offers a great opportunity to showcase your skills and create a functional and beautiful piece that fits your specific needs.

Building Furniture with Curves

Working with curves requires specialized tools and techniques, pushing the boundaries of your woodworking knowledge. This will introduce you to techniques like steam bending or using a router for intricate shapes.

Finishing Touches: Making it Shine

No matter the project, the finishing touches are what truly elevate your creation. This is where your piece goes from "good" to "amazing".

Sanding is crucial for a smooth surface. Start with coarser grits and gradually move to finer ones. Then, apply a finish. Options include paint, stain, varnish, or polyurethane. Each finish offers a different look and level of protection. Research the best finish for your wood type and project.

Commonly Asked Questions

Q: What type of wood should I use for my first project?

A: Pine is a great choice for beginners. It's relatively inexpensive, easy to work with, and readily available.

Q: Where can I find woodworking plans?

A: There are tons of resources online! Websites like Pinterest, Instructables, and various woodworking blogs offer countless free plans. You can also find books and magazines dedicated to woodworking plans.

Q: How do I know what tools I need?

A: Start with the basic hand tools listed earlier. As you tackle more complex projects, you'll naturally discover which power tools you need to add to your collection.

Q: What if I make a mistake?

A: Don't worry, everyone makes mistakes! Woodworking is a learning process. Sometimes, you can fix minor mistakes. Other times, you might need to start over. That's all part of the learning curve.

Q: How long does it take to learn woodworking?

A: It depends on your dedication and learning style. Some people pick it up quickly, while others take more time. The key is consistent practice and a willingness to learn from your mistakes. Enjoy the journey!

Happy woodworking!

Share:

How to Make a Pallet Shoe Storage Bench – Easy DIY Guide

How to Make a Pallet Shoe Storage Bench – Easy DIY Guide

Tired of tripping over shoes scattered around your entryway? Yearning for a stylish and functional storage solution that won't break the bank? Then look no further! This easy DIY guide shows you how to transform a humble pallet into a gorgeous shoe storage bench. Get ready to unleash your inner craftsman and add a touch of rustic charm to your home. You'll be amazed at how simple it is to create this piece, and the satisfaction of building it yourself is priceless!

Gathering Your Supplies

Before you begin, gather all your necessary materials. This project requires readily available items, making it budget-friendly and accessible. A trip to your local hardware store and a quick search for a reclaimed pallet will be all you need. Remember, safety first! Wear appropriate safety gear like gloves and safety glasses throughout the project. Let's get started!

Essential Materials:

  • One sturdy wooden pallet (inspect carefully for any loose boards or splinters)
  • Wood stain or paint (choose a color that complements your home décor)
  • Wood sealant (to protect your finished bench from wear and tear)
  • Sandpaper (various grits for smoothing surfaces)
  • Screws (exterior grade for durability)
  • Drill with drill bits (appropriate sizes for your screws)
  • Measuring tape
  • Level
  • Safety glasses and gloves
  • Optional: Foam padding for extra comfort, upholstery fabric and staple gun for a cushioned seat.

Preparing the Pallet

Start by thoroughly cleaning your pallet. Remove any loose nails, debris, or dirt. Once clean, use sandpaper to smooth out any rough edges or splinters. This step is crucial for both safety and a professional finish. Pay close attention to the top surface where you'll be sitting, ensuring it's flawlessly smooth. This meticulous preparation significantly improves the overall look and feel of your finished project.

Painting or Staining the Pallet

Now for the fun part – adding color! Apply your chosen wood stain or paint evenly to the entire pallet. Follow the manufacturer's instructions for drying time and application. For a more rustic look, consider using a slightly distressed finish. Allow the paint or stain to dry completely before proceeding to the next step. This ensures a beautiful, long-lasting finish. Remember to work in a well-ventilated area and wear a mask if necessary.

Adding the Finishing Touches

Once the paint or stain is completely dry, apply a sealant to protect the wood and enhance its longevity. This step is essential to prevent future damage from moisture and wear. Allow the sealant to dry thoroughly as per the manufacturer's instructions. Optional: To create a more comfortable seating area, you can add foam padding, cut to fit the top of the pallet. Then, upholster it with fabric using a staple gun for a professional-looking finish.

Installation and Enjoyment!

Your beautiful, functional pallet shoe storage bench is almost ready! Find a suitable spot in your home and place your newly crafted bench. Enjoy your new, handcrafted creation! Sit back, relax, and admire your handiwork. You've not only created a practical storage solution but also added a unique, personalized touch to your home. The satisfaction of making something beautiful and useful with your own hands is truly rewarding.

Share:

DIY Pallet Nightstand – Free Plans & Instructions

DIY Pallet Nightstand – Free Plans & Instructions

Hey there, fellow DIY enthusiasts! So you're looking to build a nightstand, huh? And not just any nightstand, but a rustic, charming, and totally budget-friendly nightstand made from reclaimed pallets? You've come to the right place! This project is perfect for beginners, requires minimal tools, and best of all, it's practically free (except for maybe a can of paint if you're feeling fancy!). Let's dive right in!

Gathering Your Supplies: What You'll Need

Before we get our hands dirty, let's make sure we have everything we need. This list might seem long, but trust me, most of it you probably already have lying around the house!

Essential Materials:

  • Pallet wood: This is the star of the show! You'll need a section of a pallet that's roughly the size you want your nightstand to be. Aim for a section around 24" wide and 16" high. Remember to check your local bylaws to ensure taking pallets is legal. Many places have free pallets available at businesses.
  • Wood glue: A good quality wood glue is essential for strong joints.
  • Screws: Use 1 1/2" or 2" wood screws – enough to secure the pieces together nicely.
  • Sandpaper: You'll need a variety of grits, starting with a coarser grit (like 80) to smooth out rough spots and finishing with a finer grit (like 120 or 220) for a super-smooth surface.
  • Wood stain or paint (optional): If you want to add a touch of color or enhance the natural wood grain.
  • Polyurethane or sealant (optional): To protect your finished nightstand and make it easy to clean.

Tools You'll Need:

  • Hammer: For driving in those nails (if you choose to use them).
  • Screwdriver (preferably cordless): To make screwing in those screws a breeze.
  • Measuring tape: To ensure accurate cuts and assembly.
  • Saw (circular saw or hand saw): To cut the pallet wood to size. A circular saw will make this process much quicker.
  • Safety glasses: Protect those peepers!
  • Work gloves: To protect your hands from splinters and rough wood.

Building Your Pallet Nightstand: Step-by-Step Instructions

Alright, let's get building! This process is pretty straightforward, but take your time and don't rush. Accuracy is key to a solid and attractive nightstand.

Step 1: Prepare the Pallet Wood

This is where the hard work begins (though it's not *that* hard!). Carefully dismantle your pallet, removing any loose nails or staples. Inspect the wood for any damage, and select the best pieces for your nightstand. You might need to cut some pieces to size to create the desired dimensions. Remember safety first – wear your safety glasses!

Step 2: Cut and Shape

Using your saw (and wearing those safety glasses!), cut the pallet wood to the dimensions you've planned. For a simple nightstand, you'll probably need two vertical pieces for the sides, one horizontal piece for the top, and possibly one or two for a shelf. Don't worry about making perfectly straight cuts; a little rustic charm is part of the appeal!

Step 3: Sanding is Key

Pallet wood can be quite rough, so sanding is crucial. Start with a coarser grit sandpaper to remove any splinters or rough edges. Then, switch to a finer grit for a smoother finish. Sand thoroughly – your fingers will thank you later!

Step 4: Assembly Time!

Now for the fun part! Apply wood glue to the joints where the pieces will meet. Then, use your screws to secure the pieces together. Make sure the screws are evenly spaced and driven in straight to avoid splitting the wood. If using a shelf, add supports in the middle for extra stability.

Step 5: Finishing Touches

Once your nightstand is assembled, you can add a personal touch! Apply a wood stain or paint to give it the desired look. Let it dry completely before applying a sealant or polyurethane for protection. If you skip the paint or stain, the natural wood look is beautiful too!

Adding Personality: Ideas for Customization

Now that you have the basic structure, let's talk customization! Here are a few ideas to make your nightstand truly unique:

  • Distressed finish: Give your nightstand a vintage look by distressing the paint or stain with sandpaper.
  • Metal accents: Add some rustic charm with metal handles or knobs.
  • Stencils: Use stencils to add patterns or designs to the nightstand.
  • Unique hardware: Use repurposed hardware, like old doorknobs, for a one-of-a-kind look.

The possibilities are endless! Get creative and have fun with it!

Commonly Asked Questions

Here are some frequently asked questions about building a pallet nightstand:

  • Q: Are all pallets safe to use? A: No. Some pallets are treated with chemicals, which can be harmful. Look for heat-treated pallets (HT) or those marked with an IPPC stamp.
  • Q: How long does this project take? A: Depending on your experience level and the complexity of your design, this project could take anywhere from a few hours to a full day.
  • Q: Can I use different types of wood? A: Yes! While pallet wood is budget-friendly and readily available, you can use other types of wood if you prefer. However, the process might require adjustments in terms of cutting and sanding.
  • Q: What if I don't have all the tools? A: You can borrow or rent tools from friends, family, or a local tool rental shop. Many hardware stores also have tool rental services.
  • Q: How do I ensure the nightstand is sturdy? A: Using strong wood glue and plenty of screws in strategic locations will ensure the nightstand is sturdy and long-lasting. Consider adding bracing or support if needed.

And there you have it! A complete guide to building your very own DIY pallet nightstand. Remember to have fun, be creative, and don't be afraid to experiment. Happy building!

Share:

Best Woodworking Tables for Power Tools & Heavy Use

Best Woodworking Tables for Power Tools & Heavy Use

Choosing the right workbench is crucial for any serious woodworker. It's the backbone of your shop, the steadfast platform upon which you'll build, shape, and refine your creations. A flimsy or poorly designed table will quickly become a source of frustration, hindering your progress and potentially compromising safety. This article dives into the key features to consider when selecting a woodworking table designed to withstand the rigors of power tools and heavy-duty use, helping you find the perfect foundation for your woodworking endeavors.

Understanding Your Needs: Size, Material, and Features

Before diving into specific models, take stock of your workshop and woodworking style. Consider the size of your projects. Will you be working on intricate small-scale pieces or large furniture? A smaller table might suffice for detailed work, but building a substantial dresser requires ample space. Material matters significantly. Hardwoods like maple or rock maple provide exceptional durability and resistance to dents and scratches. Steel offers unmatched strength, but can be unforgiving on tools. Many tables blend these materials, combining the robust strength of steel with the smooth, working surface of hardwood. Finally, think about essential features. Do you need integrated clamping systems? How important is mobility? A mobile base allows for easy relocation, while a stationary bench offers superior stability.

Size Considerations: Square Footage and Work Surface Height

The dimensions of your woodworking table directly impact your workflow. Measure your largest projects to ensure sufficient workspace. Don't forget about the space required around the table for maneuverability. A cramped workspace increases the risk of accidents. The height of the work surface is equally crucial; a table that's too high or too low will cause strain and fatigue. Aim for a height that allows you to work comfortably with your arms at a relaxed angle.

Material Selection: Durability and Longevity

The durability of your workbench directly correlates with its longevity and overall performance. Hardwood tops offer a smooth, resilient surface, ideal for hand tooling and providing a stable base for power tools. However, hardwoods can be susceptible to dents and scratches. Steel tops offer unparalleled strength and resistance to damage, but can be less forgiving on delicate tools and may require additional protection. Consider a combination of both: a steel frame with a hardwood top provides the best of both worlds.

Top-Rated Woodworking Tables for Heavy Use

Numerous manufacturers produce robust woodworking tables tailored to meet the demands of heavy-duty use. Here, we highlight some of the top contenders, noting their strengths and weaknesses:

Grizzly Industrial G8689 48" x 24" Woodworking Bench

Grizzly Industrial consistently delivers high-quality woodworking equipment. The G8689 boasts a massive 48" x 24" work surface constructed from solid wood. Its sturdy steel frame offers exceptional stability, easily supporting heavy equipment and large projects. Integrated dog holes provide versatile clamping options, enhancing functionality. However, the weight of this bench makes mobility a challenge.

Shop Fox D1337 Mobile Workbench

If mobility is a priority, the Shop Fox D1337 is a strong contender. This workbench features a heavy-duty steel frame with a hardwood top, combining durability with portability thanks to its integrated locking casters. While not as large as the Grizzly, its compact size and maneuverability make it ideal for smaller workshops or those requiring frequent table repositioning.

Choosing the Right Table: Factors to Consider

Ultimately, the best woodworking table for you depends on your specific needs and preferences. Carefully assess the size of your projects, the types of tools you use, and the available space in your workshop. Consider the importance of features like mobility and integrated clamping systems. Invest in a high-quality table; it's an investment that will pay dividends in increased productivity, improved safety, and years of reliable service.

Remember to read reviews and compare models before making your purchase. Take your time, weigh the options, and select the workbench that best suits your woodworking journey. Happy building!

Share:

Custom Coffee Table DIY – Free Plans for Unique Designs

Custom Coffee Table DIY – Free Plans for Unique Designs

The coffee table, a seemingly humble piece of furniture, serves as a central hub in any living room, a stage for displaying cherished objects and a practical surface for drinks and gatherings. However, mass-produced coffee tables often lack the personality and unique charm that reflects the homeowner's individual style. This article delves into the rewarding world of DIY coffee table creation, offering detailed instructions and free plans for crafting unique and personalized pieces that will elevate your living space.

Understanding the Design Process: From Concept to Completion

Before embarking on your DIY coffee table project, a meticulous planning phase is crucial. This involves not only selecting the desired aesthetic but also considering practical aspects such as size, material selection, and construction techniques.

Defining Your Style and Functionality

The first step involves clearly defining your desired style. Do you envision a rustic, industrial, modern, or eclectic coffee table? Consider the overall design scheme of your living room. A minimalist modern living room might benefit from a sleek, low-profile coffee table, while a more traditional setting may be complemented by a richly detailed, ornate piece. Functionality is equally important. Will you primarily use the coffee table for drinks and snacks, or do you require ample storage space? This dictates the design choices regarding size, height, and potential features such as drawers or shelves.

Material Selection: A Crucial Decision

The choice of materials significantly impacts the final aesthetic and durability of your coffee table. Wood is a classic and versatile option, offering a wide range of styles and finishes. Reclaimed wood adds a unique rustic charm, while hardwoods like oak or walnut provide lasting strength and elegance. Metal, particularly wrought iron or steel, lends an industrial or modern touch. Concrete offers a contemporary, robust aesthetic, while glass provides a sleek, minimalist feel. Remember to consider the weight and maintenance requirements of your chosen materials. A heavy concrete top might require a robust frame, while glass necessitates careful handling and cleaning.

Essential Tools and Equipment

Gathering the necessary tools before starting your project is essential to maintain efficiency and prevent interruptions. The specific tools required will vary based on your chosen design and materials. However, some common necessities include:

  • Measuring tape and square
  • Saw (circular saw, jigsaw, or hand saw)
  • Drill and various drill bits
  • Screwdriver (both Phillips and flathead)
  • Sandpaper (various grits)
  • Clamps
  • Wood glue (if using wood)
  • Safety glasses and dust mask

Always prioritize safety and ensure you have the appropriate personal protective equipment (PPE) before commencing any woodworking or construction activities.

Free DIY Coffee Table Plans: Diverse Designs to Inspire

The following sections provide detailed instructions for constructing three unique coffee table designs. These plans are intended as guidelines, and you are encouraged to adapt them to your personal preferences and available resources.

Plan 1: The Rustic Pallet Coffee Table

This project repurposes reclaimed wooden pallets to create a charming, rustic coffee table. Materials: Two sturdy wooden pallets, wood stain or paint, sandpaper, wood glue, screws, caster wheels (optional). Instructions: Disassemble the pallets carefully, removing any loose nails or splinters. Sand the wood smooth. Assemble the pallet sections into the desired configuration, using wood glue and screws to secure the joints. Apply stain or paint for the desired finish. Attach caster wheels to the bottom for easy mobility (optional).

Plan 2: The Modern Minimalist Coffee Table

This plan guides you through building a sleek, minimalist coffee table using simple geometric shapes and readily available materials. Materials: Four sturdy legs (metal or wood), a large piece of plywood or MDF for the tabletop, wood glue, screws, sandpaper, wood stain or paint. Instructions: Cut the plywood or MDF to the desired tabletop dimensions. Sand the edges smooth. Attach the legs securely to the underside of the tabletop using wood glue and screws. Apply stain or paint to achieve the desired finish.

Plan 3: The Industrial Pipe Coffee Table

This design utilizes industrial-style pipes to create a strong, visually striking coffee table. Materials: Black iron pipes (various sizes and lengths), pipe fittings, a wooden or glass tabletop, pipe wrench. Instructions: Assemble the pipe frame according to your desired design. Ensure all connections are tight and secure. Attach the tabletop to the completed pipe frame. Remember to consult pipe fitting guides to ensure safe and proper assembly.

Finishing Touches and Personalization

Once the basic structure of your coffee table is complete, it's time to add the finishing touches. This is where you can truly inject your personality and create a truly unique piece. Consider the following options:

  • Finishing: Apply a protective sealant or varnish to protect the wood from spills and scratches. Consider staining or painting the wood for a personalized look.
  • Hardware: Choose unique drawer pulls or handles to enhance the aesthetic.
  • Decorative Elements: Add decorative accents such as mosaic tiles, stencils, or decoupage to personalize the surface.
  • Lighting: Incorporate LED lighting under the tabletop for a dramatic effect.

Remember, the possibilities are endless. Embrace your creativity and don't be afraid to experiment with different techniques and materials to achieve your desired result. A DIY coffee table is a testament to your craftsmanship and a unique addition to your home, reflecting your personal style and adding warmth and character to your living space.

By carefully planning, selecting quality materials, and following these detailed instructions, you can confidently embark on your DIY coffee table adventure and create a stunning, personalized piece that you'll cherish for years to come.

Share:

Step-by-Step Woodworking Table Build – Free PDF Plans

Build Your Own Woodworking Table: Free PDF Plans Included!

Hey there, fellow woodworking enthusiasts! So you're looking to build your own woodworking table? Fantastic! It's a rewarding project, and honestly, having a sturdy, well-designed workbench is essential for any serious woodworker. This guide will walk you through building a fantastic workbench, step-by-step, with free downloadable PDF plans to make the whole process a breeze.

Getting Started: What You'll Need

Before we dive into the nitty-gritty, let's gather our supplies. I've designed these plans to be relatively accessible, using materials you can easily find at your local lumberyard or home improvement store. Don't worry, I'll provide links to the PDF plans later in the guide so you can refer to the detailed measurements and diagrams.

Materials List:

  • Wood: You'll need a good amount of lumber! The exact type and quantity will depend on the dimensions you choose (detailed in the PDF plans), but I recommend using a durable hardwood like oak or maple for the tabletop and a sturdy softwood like pine or fir for the legs and supports. I personally prefer the look and durability of oak, but hey, it's your project, so choose whatever suits your taste and budget.
  • Fasteners: Lots of screws! I recommend using wood screws of varying lengths, depending on the thickness of the wood you're joining. Get some longer screws for the leg assemblies and shorter ones for attaching the tabletop. Wood glue is essential too! You can never have enough wood glue.
  • Hardware: Depending on your design preference, you might want to include things like bench dogs, a vise, or even a built-in drawer system. Check the PDF plans for specifics on this, and remember, you can always add extra features once you have the basic structure built.
  • Finishing Supplies: Sandpaper (various grits), wood stain or paint (optional), and a clear protective finish like polyurethane or varnish. I like to use a satin polyurethane for a nice balance between protection and shine. You want to protect your hard work after all the effort you will put in.
  • Tools: This is where things get exciting! You'll need a circular saw or miter saw for cutting the lumber to size, a drill and drill bits (various sizes), a screwdriver (or impact driver, which is a lifesaver!), clamps (lots of clamps!), a measuring tape, a pencil, and a level. Sanding tools like a random orbital sander will make finishing a breeze, but you could also get the job done by hand. Safety glasses and a dust mask are also essential safety gear!

Building the Leg Assembly

Alright, let's get our hands dirty! The leg assembly is the foundation of our workbench, so it's important to get this part right. The PDF plans will show you exactly how to construct strong and stable leg assemblies.

Step-by-Step Leg Construction:

  1. Cut the lumber for the legs and support beams according to the dimensions specified in the PDF plans. Take your time and double-check your measurements! Accurate cuts will lead to a much better final product.
  2. Assemble each leg unit using wood glue and screws. Use the clamps to ensure everything is square and secure while the glue dries. This is where having extra clamps comes in handy â€" the more clamps you use the better the outcome will be, and this is one step you don't want to rush.
  3. Once the glue is dry and the leg assemblies are secure, check to ensure they are perfectly square. Use a speed square and measure diagonally to make sure the angle is perfect. You can use shims if needed to adjust and make any needed corrections.
  4. Repeat steps 1-3 for each leg assembly. Consistency is key for a sturdy and level workbench!

Attaching the Tabletop

With the legs securely in place, we’re ready to add the tabletop â€" the heart of your new woodworking table. This is a crucial step to ensuring you have a stable, durable work surface.

Tabletop Construction and Attachment:

  1. Again, refer to the PDF plans for precise dimensions of your tabletop pieces. You might need to join multiple boards together to create the desired width. Ensure the boards are joined tightly and securely using wood glue and screws. You can also use biscuits or dowels for extra strength, but it's not mandatory.
  2. Once the tabletop is assembled, clamp it to the leg assemblies. Check and double check the alignment before drilling pilot holes and screwing the tabletop to the leg assembly. Make sure it's perfectly level and centered!
  3. After securing the tabletop, check the levelness one last time. You can still make minor adjustments by adding shims if needed.

Finishing Touches & Personalization

Now for the fun part â€" customizing your masterpiece! This is where your workbench truly becomes *yours*.

Sanding, Staining, and Finishing:

  1. Sand the entire workbench thoroughly using progressively finer grits of sandpaper. This will create a smooth surface for your finish to adhere to. Don't rush this step! Proper sanding is essential for a professional-looking finish.
  2. Apply your chosen stain or paint according to the manufacturer's instructions. Let it dry completely before moving on to the next step. Let it cure fully!
  3. Apply a few coats of your chosen clear finish (polyurethane, varnish, etc.), allowing each coat to dry completely before applying the next. This will protect your hard work and give your workbench a beautiful sheen. You can choose a matte or gloss finish depending on your preference.

Adding Optional Features:

Remember those optional features I mentioned earlier? Now's the time to add them! Consider adding a vise, bench dogs, or even a built-in drawer system. The possibilities are endless! Your woodworking table, your rules.

Download Your Free PDF Plans Now!

Ready to get started? Click here [Insert Link to PDF Plans Here] to download the free PDF plans! The plans include detailed diagrams, measurements, and step-by-step instructions for every part of the build.

Frequently Asked Questions (FAQs)

Q: What type of wood is best for this project? A: Hardwoods like oak or maple are excellent for the tabletop due to their durability. Softwoods like pine or fir are suitable for the legs and supports. The choice depends on your budget and aesthetic preference. Q: How many clamps do I need? A: The more clamps, the better! At least six to eight good-sized clamps are recommended for secure assembly. Q: Can I adjust the dimensions of the table? A: You can adjust the dimensions within reason. The PDF plans provide a starting point, but you can modify them to fit your specific needs and available space, but keep in mind, significant changes might require recalculations for structural integrity. Q: What if I don’t have all the tools listed? A: You can rent tools from most home improvement stores or tool rental centers. Some steps, like sanding, can be done by hand if you don't have a power sander. Q: How long will this project take? A: The build time depends on your experience and the pace you work at. Allow for several days or a weekend to complete it comfortably. Don’t rush the process; accuracy and precision are much more important than speed! Happy building! I hope this guide, combined with the downloadable PDF plans, empowers you to build the perfect woodworking table for your needs. Let me know in the comments if you have any questions or share pictures of your finished project! I'd love to see it.
Share:

人気の投稿

Powered by Blogger.